
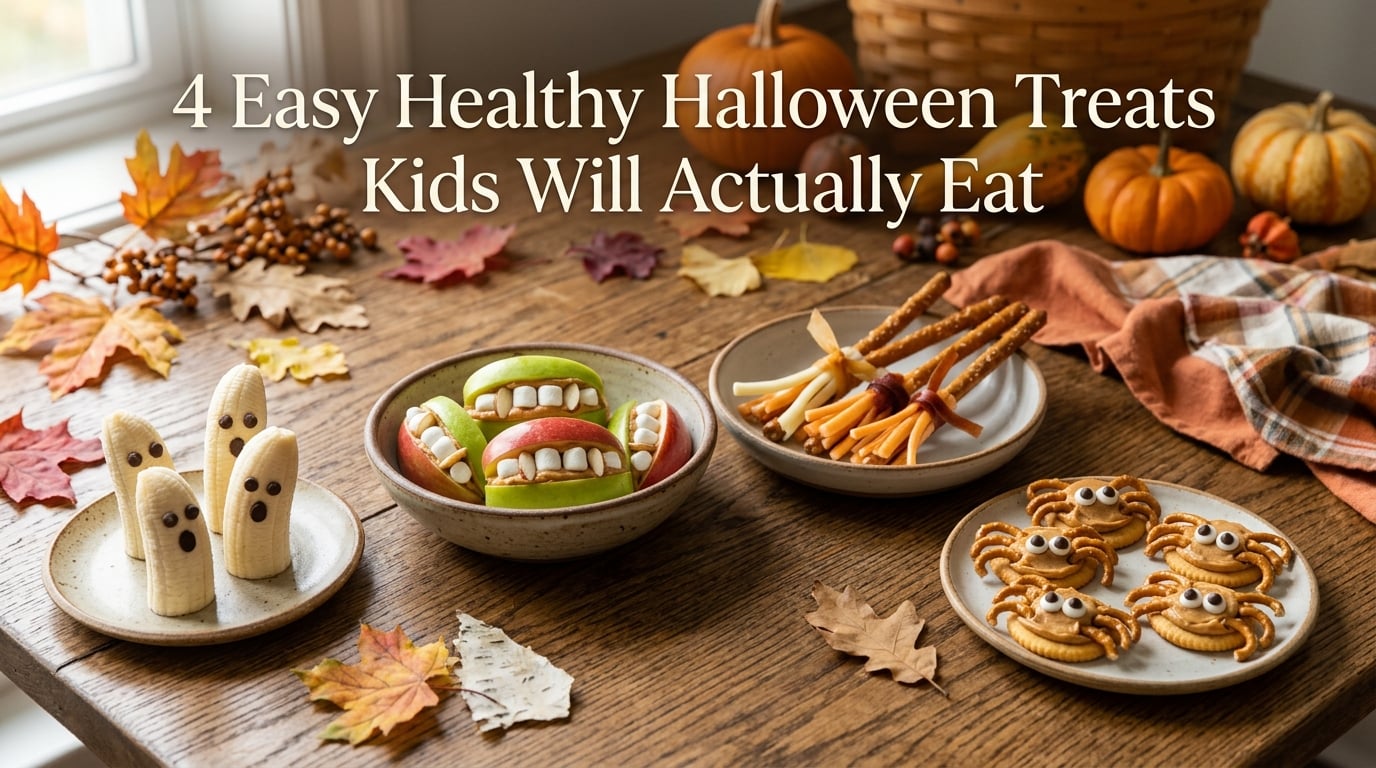
By the time my kids dump their trick-or-treat bags on the living room floor, they have enough sugar to fuel a small rocket. I love Halloween as much as the next parent, but the candy avalanche that follows always leaves me looking for a balance. That is exactly why I started making these 4 easy healthy Halloween treats kids will actually eat, and they have become a tradition in our house.
The trick I learned the hard way is that healthy does not have to mean boring. When you turn a banana into a ghost or an apple slice into a monster mouth, kids forget they are eating fruit and get genuinely excited. These four recipes use ordinary grocery store ingredients, take under 20 minutes each, and need zero baking.
I have tested every one of these at classroom parties, trunk-or-treat events, and our own Halloween movie nights. Some survived the kid approval test, and a few earlier attempts did not. The four below are the keepers, the ones my kids ask for every October. Each recipe includes allergen-friendly swaps and storage tips so you can prep ahead and actually enjoy Halloween night too.
These 4 Treats at a Glance
Here is the quick rundown before we get into the recipes. I wanted a fast reference for busy parents who are planning a classroom Halloween party or a fall festival table and need to pick one or two treats fast.
| Treat | Prep Time | Difficulty | Main Allergens | Best For |
|---|---|---|---|---|
| Banana Ghosts (Boo-nanas) | 10 minutes | Very easy | None by default | Toddlers, preschoolers |
| Apple Monster Teeth | 15 minutes | Easy | Nuts (swappable) | School parties |
| Pretzel and Cheese Witch Broomsticks | 15 minutes | Easy | Gluten, dairy | Movie night |
| Cream Cheese and Olive Spider Bites | 20 minutes | Easy-medium | Gluten, dairy | Fall festival, party tray |
Every recipe below is no-bake, uses fewer than eight ingredients, and can be made gluten-free, dairy-free, or nut-free with a single swap.
1. Banana Ghosts (Boo-nanas)
This is the treat I make first every year because it is almost impossible to mess up. My youngest was two when she helped make her first batch, and she still talks about “the banana ghosts.” If you only try one recipe from this list, start here.
Why kids will actually eat this
Kids eat with their eyes first, and a banana standing upright with a spooky face is instant Halloween magic. The chocolate chip eyes give it just enough sweetness to feel like a treat rather than a plain piece of fruit. I have watched picky eaters who normally refuse bananas devour two of these in a row.
Bananas are naturally sweet, so there is no need for added sugar. They also pack potassium and vitamin B6, which feels like a small win on a sugar-heavy holiday.
What you need
4 firm bananas (slightly underripe hold their shape best), about 24 mini semi-sweet chocolate chips, and optionally a tube of decorating icing if you want to draw mouths. That is the entire ingredient list. If you want a dairy-free version, look for allergy-friendly chocolate chips made with rice milk.
Step-by-step directions
Step 1: Peel the bananas and cut each one in half crosswise so you have eight short pieces.
Step 2: Stand each half upright on a plate or tray, cut side down, so it looks like a little standing ghost.
Step 3: Press two mini chocolate chips into the upper third of each banana to make eyes. Push them in point-first so the flat side faces out.
Step 4: If you want a mouth, draw a small oval with decorating icing below the eyes. Keep it simple, because too much detail looks messy on a soft banana.
Step 5: Serve right away, or pop them in the freezer for 30 minutes for a frosty version that my kids call “ghost pops.”
Make it work for everyone
This recipe is naturally gluten-free, dairy-free (with allergy chips), and nut-free. For a classroom with strict allergy rules, use raisins or dried blueberries instead of chocolate chips. The ghosts lose a little drama but stay 100 percent allergen-safe.
Storage and make-ahead tips
Bananas brown quickly once cut, so these are best assembled within an hour of serving. If you need to prep ahead, cut and freeze the banana halves the night before, then add the chocolate chip eyes right before the party. Frozen ghosts actually hold their faces better and last up to a week in a sealed freezer bag.
One warning I learned at a classroom party: do not stack boo-nanas on top of each other. The chocolate chips press into the banana below and leave eye-shaped dents. Lay them in a single layer.
2. Apple Monster Teeth
Apple monster teeth are the treat that gets photographed the most at our fall gatherings. They look elaborate, but the secret is that they take about 15 minutes and use four ingredients. Parents always ask me for the recipe, and they are genuinely surprised by how simple it is.
Why kids will actually eat this
A monster mouth full of jagged teeth is exactly the kind of mildly gross, totally fun thing kids love on Halloween. The peanut butter and marshmallow combo tastes like a candy bar, which tricks skeptical kids into eating a full apple slice in the process.
Apples bring fiber and vitamin C, and a thin layer of peanut butter adds protein that helps balance the sugar crash kids get from traditional candy.
What you need
2 medium apples (Granny Smith or Honeycrisp work best because they are firm and tart), 1/3 cup creamy peanut butter, 1/4 cup mini marshmallows, and optional slivered almonds or sunflower seeds for fangs. You will also need a small knife and a spoon for spreading.
Step-by-step directions
Step 1: Cut each apple into quarters and remove the core. Then slice each quarter into two thinner wedges so you have flat slices that can sandwich together.
Step 2: Spread a layer of peanut butter on one side of each apple slice. Go right to the edge, because the peanut butter is what holds the marshmallow teeth in place.
Step 3: Press mini marshmallows along the bottom edge of one peanut-buttered slice, letting them stick out like teeth.
Step 4: Sandwich a second peanut-buttered apple slice on top, pressing gently so the marshmallows peek out between the two apple layers.
Step 5: For extra-spooky fangs, tuck a slivered almond or sunflower seed between two of the marshmallows before closing the mouth.
Step 6: Arrange the finished mouths on a platter and serve within the hour.
Make it work for everyone
Peanut butter is a no-go in many classrooms, but the fix is easy. Swap it for sunflower seed butter or soy butter and you have a completely nut-free version that tastes nearly identical. For gluten-free needs, confirm your marshmallows are gluten-free, since some brands use wheat-derived starch. Dairy-free families are already covered here.
Storage and make-ahead tips
Apples oxidize fast once cut, so assemble these close to serving time. To slow browning, brush the cut apple slices with a little lemon juice or pineapple juice before adding the peanut butter. You can prep the apple slices and store them in lemon water in the fridge for up to a day, then build the mouths the morning of the party.
I do not recommend fully assembling these the night before. The marshmallows get sticky and the apples weep juice, leaving you with soggy monster mouths by morning.
3. Pretzel and Cheese Witch Broomsticks
Witch broomsticks were the surprise hit of our last trunk-or-treat. I brought them thinking they were filler, and they disappeared before the spider bites. There is something about the broom shape that kids find irresistible, and the salty-salty crunch makes them genuinely satisfying.
Why kids will actually eat this
The broom shape is recognizable and fun, and kids love anything they can hold by a “handle.” Because these are savory rather than sweet, they break up the sugar overload of a Halloween spread. My kids actually ask for these as an after-school snack in October, not just at parties.
String cheese gives a hit of calcium and protein, and pretzels provide a satisfying crunch without the empty-sugar spike of candy.
What you need
6 mozzarella string cheese sticks, 24 thin pretzel rods or sturdy pretzel sticks, and a small bunch of fresh chives. You will also need a small paring knife. That is it. Three ingredients, one of which is a garnish.
Step-by-step directions
Step 1: Cut each string cheese stick crosswise into four equal pieces, giving you 24 small cylinders.
Step 2: Take one cheese piece and carefully fraying the bottom third by cutting it lengthwise into thin strips. Stop cutting about two-thirds of the way up so the top stays intact to hold the pretzel.
Step 3: Poke a small hole in the solid top of the cheese with a paring knife, then gently twist a pretzel rod into the hole so the cheese sits near the top like a broom head.
Step 4: Tie a chive around the cheese where the frayed bristles meet the solid part, to mimic the binding on a real witch broom. Trim the chive tails if they are too long.
Step 5: Repeat with the remaining cheese and pretzels, then stand them bristle-side-down on a tray.
Make it work for everyone
The standard version contains gluten from the pretzels and dairy from the cheese. For a gluten-free witch broomstick, swap in gluten-free pretzel rods, which are widely available now. For dairy-free needs, use a plant-based string cheese alternative, though the texture is softer and the broom shape is a little harder to achieve.
If you want a fully allergen-safe version, skip the cheese entirely and use a slice of firm cucumber with the center seeded out as the broom head. Kids still get the broom shape and the pretzel handle.
Storage and make-ahead tips
Cheese sweats at room temperature, so keep these in the fridge until 15 minutes before serving. You can fully assemble the brooms the night before and store them covered in the refrigerator. Just know that the chives will wilt slightly and the pretzel may soften where it meets the cheese, so they look best assembled the same day.
For a classroom party, I pack them upright in a clean, dry glass so the bristles stay fluffy during transport.
4. Cream Cheese and Olive Spider Bites
Spider bites are the treat that looks the most impressive with the least effort. A black olive body perched on a creamy white cracker reads instantly as a spider, and kids think they are hilarious. I bring these to every adult Halloween potluck too, because they vanish just as fast there.
Why kids will actually eat this
The spider shape is the whole selling point, and the mild cream cheese base is a flavor kids already trust from bagels. Olives are an acquired taste for some children, but the spider body is small enough that even kids who skip the olive end up eating the cracker and cream cheese happily.
Cream cheese offers protein and calcium, and using a whole grain cracker turns this into a snack with real staying power rather than empty carbs.
What you need
12 round crackers (butter, Ritz-style, or gluten-free), 4 ounces of softened cream cheese, 1 can of large black olives, and a small handful of fresh chives or thin pretzel sticks for legs. A butter knife and a cutting board are all the tools you need.
Step-by-step directions
Step 1: Spread a generous layer of softened cream cheese onto each cracker, going almost to the edge so the white background is even.
Step 2: Drain the black olives well. Slice six olives in half lengthwise to create spider bodies, and set aside.
Step 3: Take the remaining olives and cut them into thin rings. Cut each ring in half to make curved legs, or use snipped chives or pretzel stick pieces as an easier leg option.
Step 4: Place one olive half, cut side down, in the center of a cream-cheesed cracker to form the spider body.
Step 5: Arrange eight legs around the body by pressing four pretzel pieces or chive strips on each side. Tuck them slightly under the olive so they stay put.
Step 6: Repeat for all crackers, then chill for 10 minutes so the cream cheese firms up and holds everything in place.
Make it work for everyone
For a gluten-free spider bite, use your favorite gluten-free round cracker. For dairy-free, swap the cream cheese for a plant-based cream cheese spread, which spreads and sets almost identically. This recipe is naturally nut-free, which makes it a safe default for most school parties.
If olives are a hard no for your kids, replace the olive body with a slice of dark purple grape or a blackberry. The spider still reads clearly, and the fruit version is sweeter for kids who lean that way.
Storage and make-ahead tips
Spider bites hold up beautifully for make-ahead prep. Assemble them up to 24 hours in advance, cover tightly, and refrigerate. The cream cheese actually sets firmer overnight, which keeps the legs and bodies from sliding. The only thing that suffers is the cracker, which softens slightly, so use a sturdy cracker if you are prepping ahead.
Do not freeze these. The cream cheese separates and gets grainy when thawed, and the olives turn mushy. They are best treated as a fridge-only make-ahead treat.
How to Make Healthy Halloween Snacks Kids Actually Want
Making the treats is the easy part. Getting kids excited about eating them over a pillowcase full of candy is where most parents, including me, hit a wall. These are the strategies that actually work after years of Halloween trial and error.
Lead with presentation
Fun presentation is the single biggest factor in whether kids try a healthy Halloween snack. I learned this from other parents on forums, and it held true in my own kitchen. A banana ghost standing on a black plate with a few plastic spiders around it gets eaten twice as fast as the same banana on a plain white plate. Use dark platters, Halloween napkins, and tiny pumpkin decorations to sell the theme. Kids are remarkably visual eaters.
Handle allergens carefully for school
Most classroom Halloween parties now require nut-free treats, and many are full allergy-restricted zones. Always check with the teacher before sending food. When in doubt, go with the banana ghosts or the dairy-free spider bites, since both can be made free of the top eight allergens. Label anything homemade with a small card listing the ingredients, because parents of allergic kids genuinely appreciate the transparency.
Prep on a schedule
The night before a party is chaos, so I split the work across two days. On day one, I wash and cut apples, slice olives, soften cream cheese, and freeze banana halves. On party day, assembly takes under 30 minutes for all four treats combined. Spider bites and broomsticks are the best make-ahead candidates, while boo-nanas and monster mouths should be finished close to serving.
Keep costs reasonable
None of these treats requires specialty ingredients, which keeps the cost low. A batch of all four treats feeds roughly 20 kids for under $15 total using store-brand items. Bananas and apples are the cheapest components, and string cheese bought in a multi-pack brings the per-piece cost of broomsticks down to pennies. Skip the fancy decorating icing and use what you already have.
Know when healthy treats will not work
I want to be honest about this. Healthy Halloween treats do not always win. At a trick-or-treat night where every other house is handing out full-size candy bars, kids will ignore even the cutest banana ghost. Save these for controlled settings like classroom parties, fall festivals, and movie nights at home, where the treats are the main event rather than competing with a candy haul. Setting that expectation saves disappointment.
For handing out to trick-or-treaters at the door, non-food items like glow sticks, crayons, and Halloween erasers tend to work better than healthy snacks, since loose food from strangers raises safety concerns for many parents.
What are healthy Halloween treats for kids?
Healthy Halloween treats for kids are nutritious snacks made with real ingredients like fruit, cheese, and whole grains that are shaped or decorated to look spooky. Popular examples include banana ghosts with chocolate chip eyes, apple slice monster teeth with peanut butter, pretzel and cheese witch broomsticks, and cracker spider bites with black olives.
What can I give my kids instead of candy for Halloween?
Instead of candy, you can give kids fruit-based Halloween snacks like boo-nanas and apple monster mouths, savory treats like cheese broomsticks and olive spider bites, or non-food items like glow sticks, crayons, and Halloween erasers. Healthy snacks work best at home and classroom parties, while non-food favors are safer for handing out at the door.
What Halloween treats do children like the least?
Children tend to reject plain, undecorated healthy foods and treats that look too much like a normal snack rather than a Halloween item. Bare fruit slices, plain vegetables, and anything with a strong bitter or overly healthy taste usually get passed over. The fix is presentation: the same foods shaped like ghosts, monsters, or spiders get eaten quickly.
What are some healthy treats for kids?
Some healthy treats kids enjoy include banana ghosts, apple slices with nut or seed butter, string cheese with pretzels, cream cheese on whole grain crackers, clementine pumpkins, and yogurt parfaits with fruit. For Halloween, decorating these everyday snacks with spooky themes makes them more appealing to picky eaters.
How do I get my picky eater interested in healthy Halloween snacks?
To win over a picky eater, focus on presentation and let them help assemble the treats. Kids who place the chocolate chip eyes on a banana ghost or press marshmallow teeth into an apple mouth are far more likely to eat what they made. Start with familiar flavors like peanut butter, cheese, and banana, and keep the spooky shapes simple and recognizable.
Wrapping Up These 4 Easy Healthy Halloween Treats
These 4 easy healthy Halloween treats kids will actually eat have earned a permanent spot in my October routine. Banana ghosts win for speed and toddler-friendliness, apple monster teeth are the showstopper for school parties, pretzel and cheese witch broomsticks break up the sugar with something savory, and cream cheese spider bites are the best make-ahead option for a fall festival table.
The real secret is not the recipes themselves but the presentation and timing. Get the spooky shapes right, prep what you can the day before, and serve these where they can be the star instead of competing with a candy pile. Do that, and your kids will actually be excited about fruit and cheese on Halloween.
Try one or two of these for your next Halloween gathering in 2026, and I promise you will be surprised how fast they disappear.